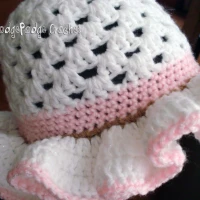
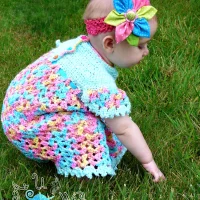
I was recently asked to create one of my Springtime Ruffle Brim Hats in an infant size. I had plans to tackle that pattern anyway so I got to work experimenting and quickly realized that the best way to scale it down was to start with your basic granny square.
To begin your granny you will want 4 groups of 3 dc and 4 chain 1 spaces. Your hat will begin to form by placing strategic increases in later rounds (I promise it’s simpler than it sounds).

So let’s begin!
Springtime Ruffle Brim Hat: (Size 6-12 Months)
Materials Needed:
- Size I (5.50mm) hook (If you crochet very tightly, use a J hook)
- Red Heart Super Saver 4 ply yarn in two or three complimentary colors.
Completed hat circumference measures approximately 15.5 inches and will stretch an approximate 17 inches.
Stitches used:
- ch=chain
- sc=single crochet
- dc=double crochet
- sl st=slip stitch
Note: The term SPACE (sp) is used throughout this pattern and refers to the area between each group of 3 dc.
Using your main color, ch 3.
Round 1: In third ch from hook (2 skipped chains count as 1st dc) work 2 dc, ch 1; (3 dc, ch 1) 3 times in same ch. Join with a sl st at the top of the ch 3.
When you have completed this round you should have 4 groups of 3 dc and 4 ch 1 spaces.

Round 2: Sl st in each dc to the next ch 1 sp. (Sl st, ch 2, 2 dc, ch 1, 3 dc) in ch 1 sp, *(3 dc, ch 1, 3 dc) in next ch 1 sp, rep from * around 3 times. Join with a sl st at the top of the ch 2.
When you have completed this round you should have 8 groups of 3 dc and 4 ch 1 spaces. Your work should also look like a traditional granny square!
Round 3: Sl st in each dc to the next ch 1 sp. (Sl st, ch 2, 2 dc) in ch 1 sp, *(3 dc, ch 1, 3 dc) in next sp, 3 dc in next ch 1 sp, rep from * around 3 times ending with a (3 dc, ch 1, 3 dc). Join with a sl st at the top of the ch 2.
When you have completed this round you should have 12 groups of 3 dc and 4 ch 1 spaces. Your work should now have a slight bulge to each of the sides as the hat begins to take its shape.
Round 4: Sl st in each dc to the next sp. (Sl st, ch 2, 2 dc) in sp, *(3 dc, ch 1, 3 dc) in next ch 1 sp, 3 dc in next sp, 3 dc in next sp, rep from * around 3 times ending with a 3 dc in next space. Join with a sl st at the top of the ch 2.
When you have completed this round you should have 16 groups of 3 dc and 4 ch 1 spaces. Your work should still be looking VERY granny like (and by now you are probably wondering if I’m pulling your leg)–but I promise, it will turn into a hat very soon!

Round 5: For this round we will only have 2 increases–strategically spaced on either side of our granny to turn it from square to hat! Sl st in each dc to the next sp. (Sl st, ch 2, 2 dc) in sp, 3 dc in the next ch 1 sp, 3 dc in the next sp, (3 dc, ch 1, 3 dc) in the next sp, (3 dc in the next space) seven times, (3 dc, ch 1, 3 dc) in the next sp, (3 dc in the next space) four times. Join with a sl st at the top of the ch 2.
When you have completed this round you should have 18 groups of 3 dc and 2 ch 1 spaces. Your work should still be round.
Rounds 6-8: Sl st in each dc to the next sp. (Sl st, ch 2, 2 dc) in sp, *3 dc in next sp, rep from * around. Join with a sl st at the top of the ch 2.
When you have completed these rounds the top of your hat should be obvious!
Round 9: Change color to your accent by joining with a sl st and chaining 1. Sc in each st around. There should be a total of 54 sc’s when you get back to your beginning ch 1. Do not join. Instead you will work in a continuous round for the next several rounds.
Rounds 10-13: Sc in each sc around.
When you have completed these rounds the main body of your hat is finished! The next section will be for the ruffle.
Round 14: Change color to your main by joining with a sl st and chaining 2. Dc in same sp as join, *1 dc in next st, 2 dc in next st, repeat from * around. Join with a sl st at the top of the ch 2. (82 dc)
Round 15: Ch 2, dc in the same sp as join, *1 dc in next st, 1 dc in next st, 2 dc in next st, rep from * around. Join with a sl st at the top of the ch 2. (108 dc)
Round 16: Change color to your accent by joining with a sl st and chaining 1. 1 sc in the same sp as join, *1 sc in the next 3 sts, 2 sc in the next st, rep from * around. Join with a sl st at the top of the ch 2. (133 sc)
Finish off and weave in all tails.

And that’s how you turn a traditional granny square into an adorable hat! You can play with colors or yarns and have an infinite amount of looks for this sweet hat. Leave the ruffle brim off and put a flower on it for an entirely different take!
I hope you enjoyed this project as much as I did and if you’d like to share your finished project, why not post a pic in our facebook group!

Keep an eye out for an update with a larger size: 18-24 months!!