
HodgePodge Knits FREE mini classes are designed to get you started with knitting. They are NOT an inclusive class but will cover the essentials and provide everything you need to begin down the road toward knitting nirvana! I recommend spending several days practicing the techniques presented before moving on to the next lesson.
Please enjoy and don’t forget to head to the sidebar to click the follow buttons so you don’t miss a thing!

CLASS ONE!!
Casting on!
For our first class, we will all practice casting on using five different methods. Your homework (should you choose to participate) is to practice each style of knit cast on until you feel confident that you can be successful using it without watching the tutorial.
Obviously, these specific videos won’t work for everyone so if the video isn’t working for you, just browse through YouTube for another video with the same technique and keep searching until you find one that suits your style.
Make sure you practice them all because you will find that they all have their merits, and don’t forget to have fun!
e-wrap cast on: https://www.youtube.com/watch?v=DbESOnIu5YM
knit cast on: https://www.youtube.com/watch?v=nWJQvsZ6kT0
long tail cast on: https://www.youtube.com/watch?v=sN9cNEozOLc
cable cast on: https://www.youtube.com/watch?v=jwQEpMLxHUo
provisional cast on: https://www.youtube.com/watch?v=j904tmdt6iU
***
CLASS TWO!!
Knitting Styles!
Hopefully by now you are all practiced with how to cast on and have a preferred method. For class two, we will be learning how to knit using two styles!
Why two styles?? Well, since you asked, why not head on over to About.com to read up on why it’s important to learn how to knit in different styles 🙂
http://knitting.about.com/od/knittingquestions/f/knitting-styles.htm
Once you have read up, it’s time to put your needles to work! Your assignment this week (should you accept) is to practice both styles of knitting!
Please Note: Our lessons come to us via Cotton & Cloud but if you find that the videos linked do not work for your particular style of learning, feel free to search for alternatives.
The first style we will explore is Continental knitting (also known as German knitting) https://www.youtube.com/watch?v=Zsp_GvkMfQI&list=UUvpfQjN99P31tKrCvrfy0ow
The second style we will explore is English knitting (sometimes also called American knitting or throwing) https://www.youtube.com/watch?v=PexfmnCl89I
Your homework is to cast on at least 10 sts and knit at least 10 rows in both the Continental AND English styles. (No cheating!! The purpose of this exercise is to find a style that suits you and you won’t know unless you practice!! Even if you’ve been happily knitting in English or continental for a long time, it’s worth it to learn the other method.)
If you’re up to it, head on down to the comments below and let me know what your preferred style of knitting is and why you enjoy using that method!
***
CLASS THREE!!
Purling Styles!
So far we’ve tackled how to cast on and how to work the knit stitch. Hopefully you’ve been practicing and can tackle both like a pro.
By now you’re probably also leaning heavily on one way to cast on and I’m guessing you’re pretty comfortable holding your needles.
This week we will tackle the purl stitch and for the sake of continuity, we will also be learning how to purl using two styles!
If you missed the article last week, now is a good time to head on over to About.com to read up on why it’s important to learn how to knit in different styles: http://knitting.about.com/od/knittingquestions/f/knitting-styles.htm
Your assignment this week (should you accept) is to put your needles to work!
Please Note: Our lessons come to us via KnittingHelp.com and Dummies.com but if you find that the videos linked do not work for your particular style of learning, feel free to search for alternatives.
The first style we will explore is Purling in the continental style:
https://www.youtube.com/watch?v=LEkuYJyuqd4
The second style we will explore is Purling in English the style: https://www.youtube.com/watch?v=0stkhQkvTqA
Your homework is to cast on at least 10 sts and purl at least 10 rows in both the Continental AND English styles. (No cheating!! The purpose of this exercise is to find a style that suits you and you won’t know unless you practice!! Even if you’ve been happily purling in English or continental for a long time, it’s worth it to learn the other method.)
Drop a comment below with your preferred style of purling and why you enjoy using that method!
***
CLASS FOUR!!
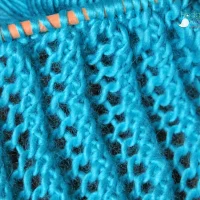
Ribbing!
As crocheters, we all understand that ribbing takes the word STRETCH pretty seriously. It’s no different in knitting and that’s why today’s lesson is all about the rib stitch and how to get it right!
Ribbing is stretchy, but fitted, and always reverts back to form. Ribbing also makes a good border on a flat project that’s knit in stockinette, which would otherwise curl on the bottom or top edges. Beyond that, ribbing is perfect for creating a pattern on its own, like a scarf.
So how do you knit ribbing? Ribbing is a series of alternating columns of stockinette stitch, one column facing outward next to a column facing inward. The most common ribs are 1 x 1 and 2 x 2. DON’T PANIC IF YOU HAVE NO IDEA WHAT THIS MEANS!!
The first thing we need to learn is how to work the stockinette stitch!
Disclaimer: Our video tutorials come to us today from New Stitch a Day, HowCast, and Studio Knit. If you find that the tutorial doesn’t work with your style of learning, feel free to hunt around for similar tutorials that do.
Stockinette Stitch: https://www.youtube.com/watch?v=Fse7UsMfL7w
Once you have practiced the stockinette stitch, it’s time for the main event!! Your homework, should you choose to tackle it, is to create a knit rib of at least 10 sts by 10 rows in both the 1×1 and 2×2 styles!
1×1: https://www.youtube.com/watch?v=5B5X-s8HqZM
2×2: https://www.youtube.com/watch?v=1K4FqywGJMc
As always, have fun!!
BONUS POINTS!! (Projects for the very brave!)
****Tackle ribbing in the round by taking a peek at how it’s done here:
1×1: https://www.youtube.com/watch?v=M9u9rC6oAK8
2×2: https://www.youtube.com/watch?v=A3IUfb5BFTg
****Take your ribbing to the next level by making your very first knit project!!! https://www.youtube.com/watch?v=GLkVP77eg0c
***
TIME TO MAKE A PROJECT!!
KAL: Wristers!
For our group project, it’s time to take what we have learned and create something fun and functional! This knit along will review all of the steps outlined in the classes above as well as test your endurance (you have to make two!!) and when were are finished you should be well on your way to find more knit projects that expand on the basics!
In order to participate in the KAL all you have to do is follow this link: https://www.youtube.com/watch?v=PGXMBMLqGtM
American designer Marc Smollin will take you through all of the review you will need in order to be successful as he teaches the simple steps of the project for DaWanda DIY.
Once you have finished your project I would love to see it!! Head on over to the online DropEvent KAL album to upload a photo!
Where to click to add your project photo:


I am so excited to view these. I just bought knitting needles last week- and goodness knows I have enough yarn to play with 😉 Courtney
LikeLiked by 1 person
Best of luck on your knitting adventure!! You can do it!
LikeLike
[…] HodgePodge Knits! […]
LikeLike