
I’ve been drooling over yarn bowls for probably as long as I’ve been crocheting. They are gorgeous works of art that not only are functional but are beautiful as well.
However, the price of them (I’ve seen them run up to nearly $100!!) puts them far out of budget for this frugal crocheter.
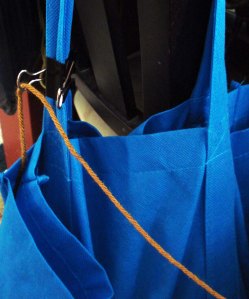
Still, I’ve always wanted one and so I started looking for alternatives that I could use on the cheap. I’ve tried everything from plain old ceramic and plastic bowls to mason jars (those are actually pretty cool to use for smaller yarn balls.) But in the end, my favorite DIY yarn bowl isn’t even a bowl. It’s actually a tote bag that I hang off the back of a chair with a binder clip attached to the handle. It’s super simple to throw my skein (or skeins) into the bag, thread the clip, and crochet away without any issues.
It’s functional for sure but this set up is lacking in the work of art category.
So what is a crocheter to do when they want a bit of flair but don’t want to shell out big bucks to get it? You think outside the box and get creative!!
In order to get started, you’ll need a few things. The good news is that most of the items you’ll need you probably already have on hand!
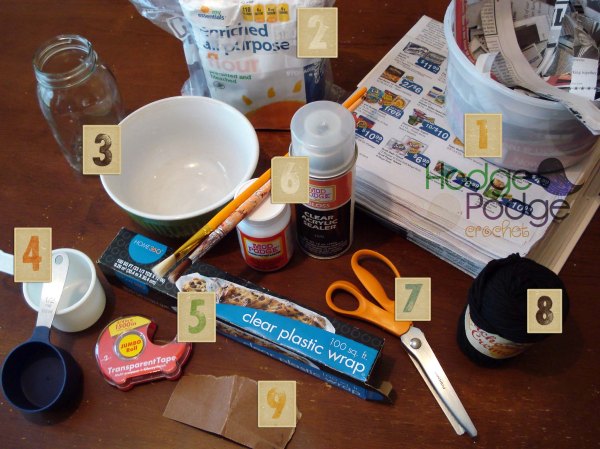
Let’s take a closer look at the things you’ll need to get started.
First on the list (and coming in at number ZERO) is time! You need at least three or four days to complete this project. This is not one of those things you can rush through. So if you have some time, and patience, let’s move along through the rest of the supplies!
1–Newspaper. You actually don’t need a lot of paper to complete this project. I managed to get through my entire bowl using little more than one weekly newspaper. I suggest you use newspaper only because it’s thin enough to hold the glue but not too thin that it will shred when wet.
2–Flour. Any brand of regular flour will work for this project. For my whole project I used ONE cup of flour. That’s it! Optional (but highly recommended) is to add-on the list some table salt. You only need a pinch or two but it will keep away funky things like mold so it’s worth it to have!
3–A smallish sized bowl and a mason jar. You can use ANY bowl for this project. I went into my cabinets with the biggest yarn ball I have on hand and just started plopping it into bowls to see what would fit the best. I settled on a small bowl which is 22″ around and 4″ deep. Also keep in mind that the larger the bowl, the more work (and newspaper) involved! As for the mason jar, I have a bunch of these on hand but you can use whatever works for you. A general rule of thumb is that you want to have something wide enough to fit inside your upturned bowl that is at least half as tall as the bowl is (so it can prop your bowl off the work surface and is sturdy.)
4–Measuring cups. You’ll need a 1 cup measure and a 1/2 cup measure.
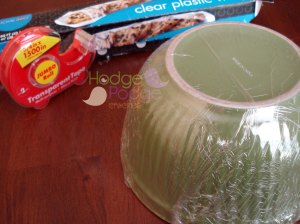
5–Plastic wrap and tape.
6–Mod Podge and some paint brushes. I use Mod Podge as a sealer. (You don’t technically have to buy this as there are loads of DIY Mod Podge formulas out there that will do the job, but I happened to have it on hand and it’s already done so why add another project when there is already so much going on here!) This is probably the most expensive part of the whole project. If you purchase a bottle, it will run you about $6 for the Mod Podge and $6.50 for the acrylic sealer. Both can be found at your local craft store (or at WalMart where I got mine.)
Quick tip: If you have a Michael’s craft store anywhere around you, take your 40% off coupon (that comes in their weekly circular) with you and relish in the savings!
Mod Podge will turn your project rock solid and one jar will last you through lots and lots of bowls. The sort you choose is totally up to you. I decided to go with a gloss finish but they also sell Mod Podge in matte finish. You can also decide to add the acrylic sealer, which will provide extra protection for your finished item.
7–GOOD scissors. I happen to have an old pair of Fiskars pinking sheers that I used, but you can use any really heavy, sturdy, utility scissors you have on hand. Once your bowl is done drying, you’ll need the best scissor you can find to cut through the layers of paper and glue. Kiddie safety scissors won’t work here!
8–Yarn. I used cotton but you can use anything you have on hand. Even scraps will work if you got them.
9–Sandpaper. If you don’t have sandpaper on hand, try a nail file. It works just as well and you just need it to smooth your yarn opening.
OPTIONAL EXTRAS!
- Acrylic paint. You don’t want to paint your new bowl with any paint that has the word ‘watercolor’ on it. Adding back water when your bowl is all nice and dry is not a good idea. You can use any acrylic color and can find small 2 oz. tubes of it for about $2 at WalMart. One tube will last a long, long time!
- Glue gun and glue sticks. This is important to have on hand if you want to add embellishments to your bowl! I usually frown at using the glue gun with yarn, but here it totally works. You can also get crazy and glue all sorts of other fun things to your bowls!
- Party napkins. If you want to decoupage your bowl, the simplest way to get it done is with some party napkins. You can usually find these in the discount bin at your local store. I picked up a pack of 12 for $0.99 at WalMart. A great way to stock up and not spend a fortune is just to keep your eyes peeled for these gems whenever you’re out!
And that’s it!! Once you have your materials in place, it’s time to get dirty!
DIY Paper Mache Yarn Bowl
Start by tearing (don’t use scissors!!) your newspaper into strips. For this project, you want them to be about a half-inch wide up to an inch maximum and about four to six inches long.
Quick tip: Skip ripping the extra glossy ad inserts from your newspaper and use those for table protection instead. Since they don’t absorb the glue as well, they make a perfect throw away work surface that saves you from the work of cleaning up the gunk off your table.
Tear more than you think you’ll need for your project because you don’t want to stop in the middle to tear more!

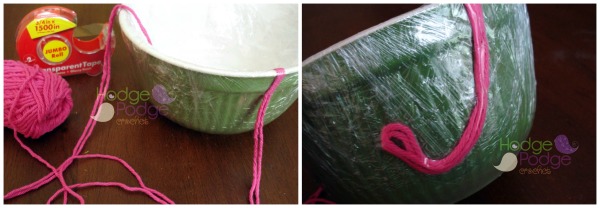
Once your paper is shredded, it’s time to prep your bowl. Using your plastic wrap and tape, wrap the outside of your bowl and secure it with the tape on the inside. Press out all the air to get out any weird bubbles that might cause your finished bowl to warp. You want it as tight to the bowl as you can get it.
Now for a little fun! Grab your yarn and pull out a long length and then double it so you’re holding it double stranded. Tape one end inside your bowl and then plan how you want your yarn opening to look!
Quick tip: Keep in mind that your newspaper needs to connect so you can’t do any cut out type shapes, but you should be fine with loose whirls, a random dot opening, or fun zigzags. Also, the more curvy–the more work!! If you want to save yourself some grief, take it easy with the amount of curve you add!
Make sure you cover your yarn completely with the tape!! If you don’t, it might stick to your paper mache and cause a tear (and some full-blown–temper tantrum–throwing things across the room–cursing like a sailor–kind of frustration!!) when you are unmolding.
When you’re happy with your finished design, it’s time to mix up the glue. There are so many different paste recipes but for our bowl we are going with this basic recipe: 1 Part Flour: 2 Parts Water
What that translates to for our bowl is 1/2 cup flour and 1 cup water. This is where you would also add a couple pinches of salt, which I HIGHLY RECOMMEND to prevent molding.
You can mix this by hand or use a fork; whatever works best for you. Make sure you get out any lumps and when you’re done it should resemble a slightly thicker version of skim milk. You can make this glue thicker but I find that the thinner it is, the easier it is to work with, the longer it lasts, and the faster it dries.
Place your bowl upside down (plastic covered side up) on your mason jar (or whatever it is you are using to prop your bowl up off your table.) Make sure your table is covered, your paper strips are handy, your glue is close, and it’s time to paper mache!
The Process
If you’ve never done paper mache before, it’s really simple and a lot of messy fun! You don’t want to overdo the glue because the more glue you have on there, the longer it will take to dry and the more problems you’ll run into with funky smells and all that stuff we want to avoid! These are the steps to creating a perfect first layer for your bowl:
1. Hold one end of a single strip of newspaper and dunk it into the bowl of glue. Completely submerge the strip into your paste and pull it out, holding it above the bowl.
2. Next, hold the top of the strip with one hand and sandwich it between your fingers on the other. Swipe your fingers down toward the length of the strip, letting the excess glue fall back into the bowl.
3. Lay the strip across your bowl. Once the strip is on the bowl, smooth it down flat with your hands working out all air bubbles. Work the paper strips all over the bowl being sure to cover the entire bowl. Don’t worry about overhanging strips because we will use those heavy duty scissors to trim later!
4. Add four or five more layers of strips to your bowl and sit aside to completely dry overnight.
If you are a visual learner like me, then watch this short YouTube clip from About.com on how to paper mache. Keep in mind that she’s using a slightly different glue measurement and recipe than us but the look of the paste and her process of layering the strips is exactly the same.
When you get to the point in your process where you have to paper mache around your yarn, you want to take your time. You can gently tear the paper around the yarn (that you taped to the bowl mold) to get a nice clean opening. The more time you spend making this perfect now, the less sanding you’ll have to do later!
Quick tip: When you are all done creating your first four or five layers of paper mache and are ready to leave it to dry, toss your leftover glue and make a fresh batch when you are ready to repeat.
Here is what yours will look like from the front and back when the first layer of paper mache is finished:
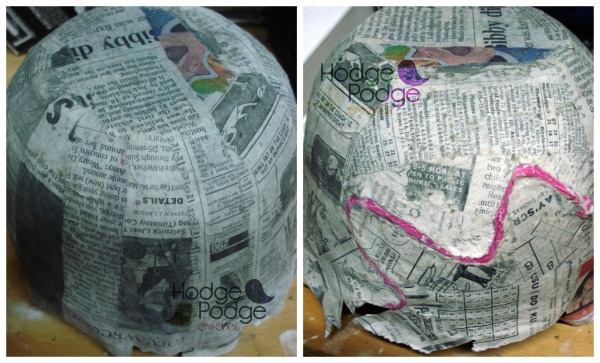
The paper mache will start off a dull grey color when wet and turn a bone color when dry. It will also feel stiff under your fingers when you touch it. When you see that it’s turned that bone color and feels stiff under your fingers (which typically takes overnight!) it’s time to repeat the process.
When you are finished putting on your second set of layers, your bowl should have about 8 to 10 total layers of newspaper. This will ensure a thick and sturdy bowl that won’t break on you when you unmold it.
Leave it to dry overnight.
Once your bowl has turned that same bone white again and is firm when you apply some pressure, CAREFULLY use a butter knife and pry it away from the inside rim of the bowl. You want to be able to wiggle your bowl free without impaling it–so go slow! Untape your plastic wrap and give it a gentle tug. If you’ve done your prep correctly, your bowl mold should pop right out.
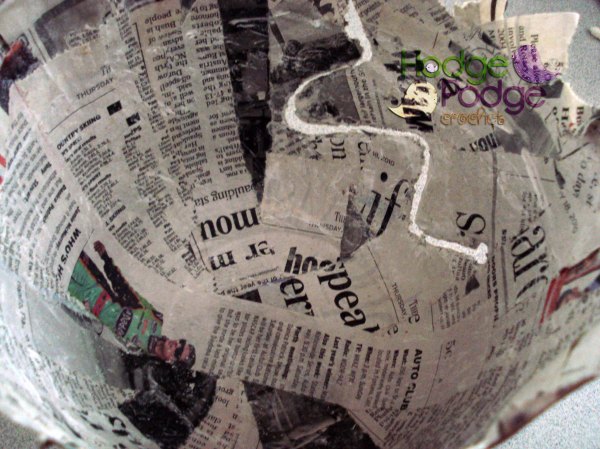
You may notice an odor when you pop your bowl free–and that’s totally normal! It means that the inside of your bowl hasn’t completely dried and that you’ll have to put a little more wait time into it in order for your bowl to be ready to decorate.
Quick Tip: If you skip this step and just move on, your bowl won’t be as sturdy and you may run into some issues down the road–so take your time and let it dry thoroughly.
Once your bowl is totally dry, it’s time to decorate!! This is the part I enjoy the most because you can get as crazy as you want or tone it down and keep it classy. It’s your bowl, so own it!
If you don’t want to use paint or decoupage on napkins, all that’s left is to sand your openings, trim the top part of your bowl with your scissors, and Mod Podge the newspaper. The Mod Podge will seal your bowl and the layered newsprint will create a fun and interesting look.
Quick tip: You may notice the newspaper around your cutout begin to warp on you and bend in weird ways every time you layer on a new coat of anything wet. Not to worry!! Simply keep bending it gently back into shape when it’s dry and it should hold its shape and be fine for you.
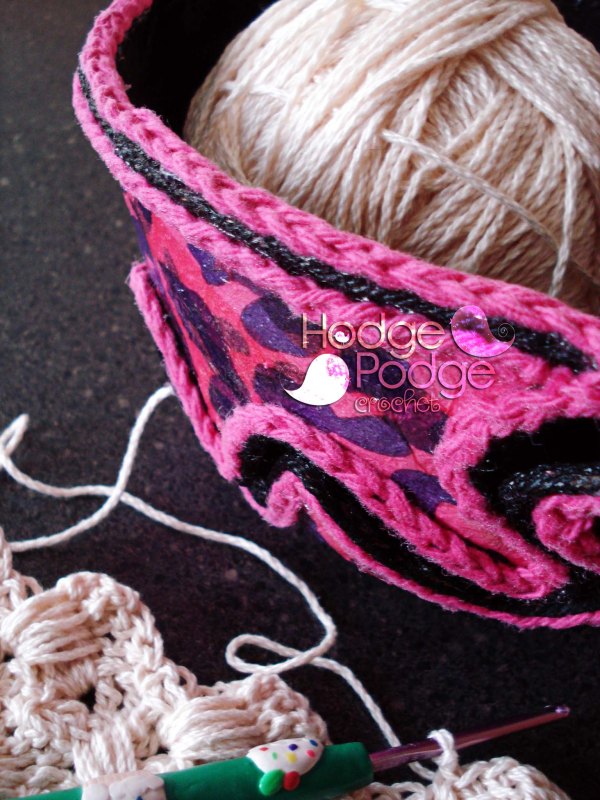
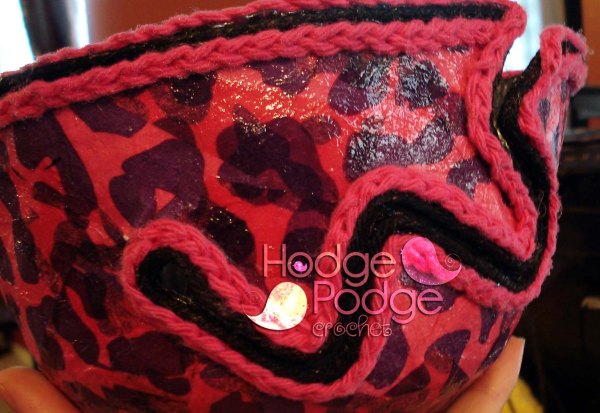
I decided to paint my bowl AND decoupage AND hot glue some fun crochet embellishments–because…why not!!
After sanding and trimming my bowl, I painted it with a base color of white acrylic.

When it dried, I coated it again so that the newsprint was completely covered by two layers of paint. Then I got crazy with the decoupage!
Decoupaging napkins is probably the simplest and most forgiving thing you will ever attempt in your life! The only prep work involved is to remove all the layers of the napkin, saving only the very thin print to work with. Most party napkins have three layers so pay attention that you got all three separated!
Then you have to decide if you are going to leave your napkin whole, or tear it into strips. I decided to tear mine into strips and layer it onto the outside of my bowl.
The decoupage process is as follows:
Brush on a thin layer of Mod Podge, then stick on the tissue, then brush on another layer of Mod Podge over that making sure the napkin is covered and FLAT. Now is not the time to be adding in lumps after all that hard work!
That’s it! It’s very forgiving but take care that you don’t go too fast and brush in air bubbles. Also, you WILL get sticky and end up sticking to everything around you–your bowl, your brush, your tissue!! So keep a wet paper towel nearby to wipe your fingers when you start to stick to stuff!
Quick tip: Keep in mind that if you go with Mod Podge in a gloss it’s going to intensify the colors in your napkins in a big way! I picked up some very muted and dull pink leopard print napkins and when I was all done the color was hot pink and super shiny! I’m not entirely sure what happens with the matte finish but the next time I’m at the store you can bet that a bottle of Mod Podge in matte is going to be on my list!
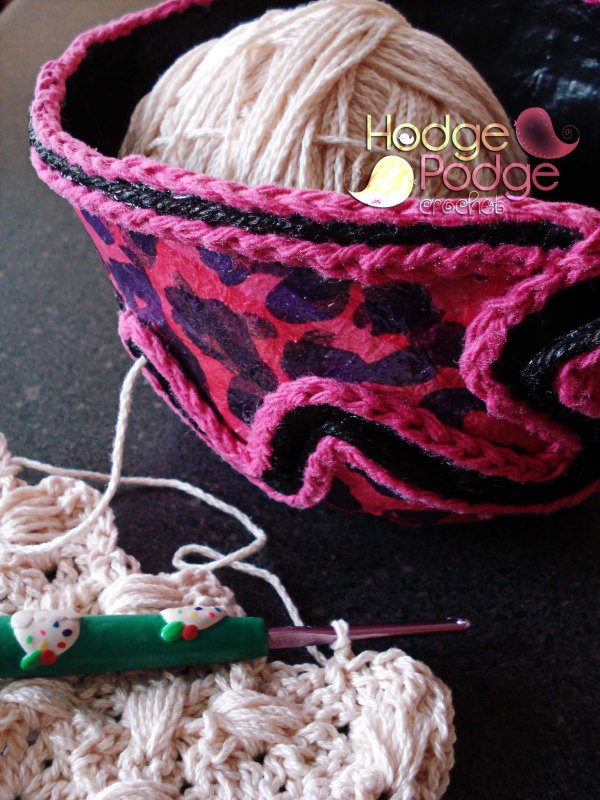
To match the color (cause I love a good pink and black combo), I painted the inside of my bowl black. Then I wanted to add in some yarn–because in the end, it’s all about the yarn, right guys?!?! I took some cotton yarn and just crocheted a simple chain that I hot glued around the top of my bowl and then accented the yarn cut out with it.
Then I sprayed the inside and the outside of my bowl with some acrylic sealer and called it DONE!
Quick tip: If you have an issue with your bowl slipping while you use it to crochet, you can pick up some cheap furniture grip tabs or some grip shelf liner and glue it onto the bottom–or if you’re impatient like me and don’t have any of that on hand, just run a thin bead of hot glue along the bottom.
I couldn’t be more thrilled because this bowl is economical (I made it for pretty much under $10 in supplies), it’s as HARD as a rock–the kids can’t destroy this one by knocking it on the floor or running into it by accident while I’m crocheting, and it’s a unique, one of a kind, work of art created by me!
If you make one and feel like sharing your creative work of art, come find me over on facebook and post a pic! https://www.facebook.com/HodgePodgeCrochet
Tagged: Acrylic paint, Craft, Do it yourself, HodgePodge Crochet, Papier-mâché, Yarn, Yarn and Hooks, Yarn Bowl


[…] Wooden Yarn Bowl Here: http://www.instructables.com/id/Bamboo-Yarn-Bowl/ Chalkboard Coffee Pot Yarn Bowl Here: http://www.4you-withlove.com/2014/09/diy-chalkboard-yarn-bowl-great-for-pet.html Paper Mache Yarn Bowl Here: https://hodgepodgecrochet.wordpress.com/2013/07/24/diy-paper-mache-yarn-bowl/ […]
LikeLike
[…] variety—to try. My inquisitive nature is to blame for things like DIY glow in the dark yarn, DIY paper mache yarn bowls, and the crochet Indian […]
LikeLike
[…] Hodge Podge Crochet shares her technique for making paper macher yarn bowls. […]
LikeLike
[…] I’ve been having a ball with other crafty projects like clay, paper mache, painting, and book making. (Not to mention countless other things I’ve yet to blog […]
LikeLike
[…] In paper mache yarn bowl making: […]
LikeLike
I have to gather supplies and try this out..
LikeLike
Love your bowl. I have to try this.
LikeLike
Oh man I have to make some of these!!! Love it to bits!!! Thanks so much for sharing, I have been looking for something to put my yarn in and this would be wonderful.
LikeLike
Reblogged this on Crazy Cat Craft Lady and commented:
I just discovered this and just had to repost it !! Luv it
<3<3<3<3 ❤ 5 heart review
LikeLike