
Crochet by As U Wish Embroidery & Crafts
**DISCLAIMER** Before I begin this tutorial, let me tell you that the basic pentagon, granny, hexagon etc. shapes are not copyrighted by anyone to my knowledge. This tutorial is copyrighted by me–but that doesn’t mean that somebody else can’t have ever made or can never make a pentagon or a hexagon.
Because we’re talking motif here, think of this project like a really small blanket. I know ANYONE who crochets has made at least one motif joined blanket (granny squares are really popular with new crocheters–AND THEY’RE MOTIFS).
The first motif pattern I want to show you how to make is the pentagon (5 sides).
Below that pattern I will take you through my version for the hexagon (6 sides) turtle shell blanket. My pattern is free to use and alter in any way–have at it and HAVE FUN!
Pentagon motif patterns are always a lot of fun to make and you can flip them and turn them to create all sorts of adorable projects. You can find loads of free patterns all over the internet for them, these are two of my favorites:
Basic Five Sided Pentagon Shape Granny Style Motif
Basic Five Sided Pentagon Shape-Free Crochet Pattern
Once you have the basics down you can really turn this on its head and make the pentagon any way you want! This is what I’ve come up with.
These motifs (both the pentagons and the hexagons) utilize front post double crochet. If you aren’t familiar with how to work this stitch, then I think now would be a good time to CLICK HERE. The link will take you to YouTube where my favorite crochet teacher, Teresa, will show you how to work this stitch. If you’re a lefty, you’ll want to CLICK HERE. (She’s so awesome she can crochet with both hands.)
Now that you’re prepared, it’s time for the motif patterns.

Front (RIGHT SIDE) of Pentagon Motif

Back (WRONG SIDE) of Pentagon Motif

Front (RIGHT SIDE) of Hexagon Motif

Back (WRONG SIDE) of Hexagon Motif
Printable Pattern:
Find me (and this freebie plus so much more) on Craftsy:
![]()
Pentagon Motif Pattern
Materials Needed:
Hook sizes G and E, tapestry needle, Two colors of 4 ply worsted weight yarn (one will be MAIN and one will be CONTRAST)
Stitches used:
- sl st (slip stitch)
- ch (chain)
- dc (double crochet)
- fpdc (front post double crochet: complete the stitch around the post of the next indicated stitch by inserting the hook from front to back to front around the post)
- v–st (v-stitch: [dc, ch 1, dc] in same space)
Pentagon Motif:
Using main color, Ch 3, sl st to 1st ch to form a ring.
Round 1: Ch 3 (counts as dc), v-st 4 times in ring, dc in ring, ch 1, sl st to top of ch 3. (10 dc)
Round 2: Ch 3 (counts as dc), fpdc around ch 3 from round 1, fpdc around next dc, *v-st in next ch 1 sp, fpdc around next dc, fpdc around next dc, rep from * around to 1st ch 1 space, dc in 1st ch 1 sp, ch 1, sl st to top of ch 3. (10 fpdc, 10 dc)
Round 3: Ch 3 (counts as dc), fpdc around ch 3 from round 2, fpdc around next dc, fpdc around next dc, fpdc around next dc, *v-st in next ch 1 sp, fpdc around next dc, fpdc around next dc, fpdc around next dc, fpdc around next dc, rep from * around to 1st ch 1 space, dc in 1st ch 1 sp, ch 1, sl st to top of ch 3. Finish off. (20 fpdc, 10 dc)
Using accent color, join in any ch 1 space with a sl st, ch 3, fpdc around ch 3 from round 3, fpdc around next 5 dc, *v-st in next ch 1 sp, fpdc around next 6 dc, rep from * around to 1st ch 1 space, dc in 1st ch 1 sp, ch 1, sl st to top of ch 3. Finish off and weave in all tails. (30 fpdc, 10 dc)
Hexagon Motif Blanket Shell Pattern
Materials Needed:
Hook sizes G and E, tapestry needle, Two colors of 4 ply worsted weight yarn (one will be MAIN and one will be CONTRAST)
Note: Hook sizes can be very tricky because everyone crochets with a different tension. If you tend to crochet tightly, your finished motif may be too small. If you crochet too loosely, your finished motif may be too large. For this project, the completed motif should measure 4 inches across (from point to point.)
To make this prop larger, you would need to size your hook up. For each hook size up, you can add an approximate half to three quarters of an inch to the finished project.
Stitches used:
- sl st (slip stitch)
- ch (chain)
- dc (double crochet)
- fpdc (front post double crochet: complete the stitch around the post of the next indicated stitch by inserting the hook from front to back to front around the post)
- v–st (v-stitch: [dc, ch 1, dc] in same space)
Hexagon Motif: Make 7
Using main color, Ch 3, sl st to 1st ch to form a ring.
Round 1: Ch 3 (counts as dc), v-st 5 times in ring, dc in ring, ch 1, sl st to top of ch 3. (12 dc)
Round 2: Ch 3 (counts as dc), fpdc around ch 3 from round 1, fpdc around next dc, *v-st in next ch 1 sp, fpdc around next dc, fpdc around next dc, rep from * around to 1st ch 1 space, dc in 1st ch 1 sp, ch 1, sl st to top of ch 3. (12 fpdc, 12 dc)
Round 3: Ch 3 (counts as dc), fpdc around ch 3 from round 2, fpdc around next dc, fpdc around next dc, fpdc around next dc, *v-st in next ch 1 sp, fpdc around next dc, fpdc around next dc, fpdc around next dc, fpdc around next dc, rep from * around to 1st ch 1 space, dc in 1st ch 1 sp, ch 1, sl st to top of ch 3. Finish off. (24 fpdc, 12 dc)
Using accent color, join in any ch 1 space with a sl st, ch 3, fpdc around ch 3 from round 3, fpdc around next 5 dc, *v-st in next ch 1 sp, fpdc around next 6 dc, rep from * around to 1st ch 1 space, dc in 1st ch 1 sp, ch 1, sl st to top of ch 3. Finish off. (36 fpdc, 12 dc)
Weave in all tails before moving on to next motif.
When you are finished with all 7 motifs, arrange them in a shell–placing 6 motifs around the center 7th motif and prepare to assemble.
You will be working the assembly with only your center motif. All flanking motifs will be joined by one side to the center first, (we will join the rest later).
Take your center motif and any flanking motif and place them wrong sides together.
Using an E hook and your accent color, sl st into the ch 1 space, working back loops only, (Please keep in mind that your motifs will be sandwiched wrong sides together, so the back loops will be the two strands that are next to each other as in the pic below)

*sl st across to next ch 1 sp., sl st in ch 1 space and arrange your next flanking motif—wrong sides together, with the center motif. Sl st in ch 1 space of new motif and center motif. Continue from * until all flanking motifs are joined by one side to center motif.


The next thing we will need to do is to sew up the rest of the seams between each flanking motif.
There are two ways you can do this. Remember: when you join your motifs you want to make sure you are holding them wrong sides together.
The hard way: Since your yarn is already attached to your hook, simply sl st that first seam between the flanking pentagons closed–taking care to hold the motifs wrong sides together, finish off. Insert your hook into both ch 1 spaces at the base (close to the center pentagon) of the next two flanking pentagons. Attach your contrasting yarn with a sl st, sl st in the back loops only to the end of the pentagons and finish off. Continue around until all seams have been slip stitched closed. Weave in all those loose ends.

The easy way: The other way you could do it would involve a tapestry needle. Since your yarn is already attached to your hook, sl st that first seam between the flanking pentagons closed, finish off. Thread your tapestry needle with a long length of contrasting yarn and simply whip stitch the rest of your seams shut–taking care to whip-stitch in the back loops only and making sure that all of your motifs are being held wrong sides together. In order to move your needle, simply thread it under your project, hiding the extra yarn in the undersides of your stitches.
When you’ve finished sewing all the seams, your project should look like this:

If you’ve joined your motifs the hard way, now would be a good time to weave in all those loose tails in the center. Don’t worry about the loose tails that are to the outside of the shell because we’ll crochet right over them when we do the border.
Now we’re on the home stretch! The only thing left to do is the outlining and detail work (like the tail and the neck.)
In order to outline our motifs, you need to join your main color with a sl st in the first dc past any inside ch 1 space, ch 1 sc in the same stitch as join, *sc all the way across to the next ch 1 space (8 sc), 1 sc in the ch 1 space, sc all the way across to the next ch 1 space (8 sc), 1 sc in the ch 1 space, sc all the way across to the next ch 1 space (8 sc), sc2tog (you will be decreasing in both ch 1 spaces on each valley of your motif joins), continue from * around to the middle of next hill portion of the motif and add in your tail.

The tail actually looks adorable–but it’s really not necessary to add in…no one will notice it if you leave it off. BUT, if you wanted to add one in, now is the time. If you are leaving it off, skip this part and just continue your border from where you left off. If you are adding the tail, follow the border pattern until you get to the center of the hill portion of a hexagon–any hexagon will do.
To get to the center of a hill portion, 1 sc in the ch 1 sp, sc in the next 4 sts. Ch 8, (you can make this a little longer if you’d like. What you are going for here is sort of a one sided leaf shape.) In the second ch from hook, sl st, sc in next st, hdc in next st, dc in next 2 sts, hdc in next st, sc in next st, sc in the next stitch on the motif, sc in the next 3 sts and continue your border around as in the pattern above. For the last stitch, join in the ch 1 and finish off.
Remember, you will want to put 1 sc in each ch 1 space in the hill portion of the motif and sc2tog in every valley potion of the motif.
The neck portion is also not necessary to do but it looks cute and I’m thinking you could sew a small button on to attach the hat when you want to store this. To complete the neck portion, find the motif at the top of your project (this should be fairly simple because the three motifs line up on on top of the other). Finding the top of the hill of the hexagon:
Row 1: Sl st in the ch 1 space, ch 3, dc in the next 8 sts, ch 3 and turn.
Row 2: dc in the next 7 sts, ch 3 and turn.
Row 3: dc in the next 7 sts, ch 3, finish off.
Note: If you’d rather have two separate pieces, leave the neck portion off.
All that’s left is to make a hat–and after all we’ve just been through, that’s going to be a snap!
Using a size H hook, Ch 4, join with sl st to first ch to form a ring.
Row 1: Ch 3 (counts as first dc throughout), dc 11 in the ring, sl st in top of beginning ch 3. (12 dc)
Row 2: Ch 3, dc in same st, 2 dc in each st around, sl st in top of beginning ch 3. (24 dc)
Row 3: Ch 3, dc in next st, 2 dc in next st, *dc in next 2 sts, 2dc in next st; repeat from * to end of round, sl st in top of beginning ch 3. (32 dc)
Rows 4–9: Ch 3, dc in next st and in each st around. Fasten off and weave in ends.
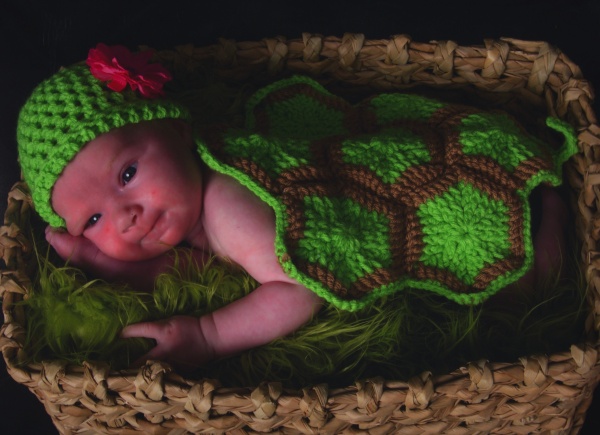
Now that you’re all done, your completed project should look like this:
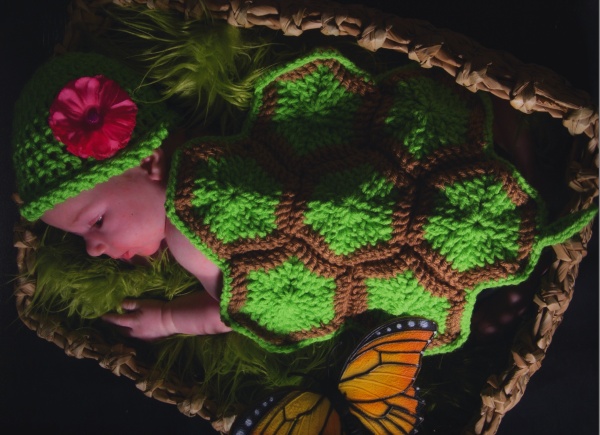
I hope you’ve had fun with this project. If you make one and want to share your pics, I’D LOVE TO SEE THEM! Pop on into our facebook group and post away!
Tagged: Crochet Fashions, cutest baby, etsy, Hat Patterns, HodgePodge Crochet, pattern materials, Pentagon Motif, Shop HodgePodge Crochet, turtle shell, Turtle Shell Photo Prop, Tutorial, worsted weight yarn


I tried to find the turtle shell pattern on your craftsy site, but cannot find it – am I simply missing it?
LikeLike
Yes. You are missing something.
http://www.craftsy.com/pattern/crocheting/accessory/baby-critters-photo-props-3-in-1/27028
http://www.ravelry.com/patterns/library/baby-critter-photo-props
LikeLike
Love these baby items. They are great for using up leftover yarns from other projects
LikeLike
Thank you for posting this free pattern its hard to find patterns that you don’t have to pay for. I made this for a friends baby & im fairly new at crocheting and it turned out perfect! Awesome pattern, thank you!
LikeLike
[…] When I was growing up, with 2 brothers, we watched our fair share of Ninja Turtles. So, when I was asked by a friend to make a TMNT inspired prop, I was beyond excited! This is what I came up with, and of course the colors can be customize. A huge thanks to Hodge Podge Crochet for the amazing turtle shell pattern (did I mention it was FREE?!?) You can find it here: https://hodgepodgecrochet.wordpress.com/2012/02/15/infant-turtle-shell-photo-prop/ […]
LikeLike
I just returned from a shower where I gave a dear friend the “turtle photo prop” I crocheted for her baby girl !!!
I used the pattern posted “INFANT TURTLE SHELL “BLANKET” February 15, 2012· by Marissa · in Crochet Fashions, Crochet for Baby, HodgePodge Crochet, HodgePodge Freebies, Photography Props,” but I did make a few changes and tweaked it somewhat.
After researching “turtles,” I saw that many turtle shells have pentagon sides with hexagon tops, so I did just that. Also, I liked the “puckered” effect [for lack of a better word HAHA] of the shells, rather than flat as a blanket. Other than these, I made the tail and border wider.
The picture doesn’t really show well, but the colors were light pink and lime green.
I’m pretty new to crocheting, only a year and a few projects, but I was VERY please with the results!
(I posted a picture on the Facebook page-I can’t do it here.)
LikeLike
The “turtle shell” was a HUGE HIT with my friend and other guest. Thank you so much for the pattern, Marissa
LikeLike
I see where it says 2 colors, but how much do I need of each?
LikeLike
You will need one 7oz skein of each color to finish this project. 🙂
LikeLike
Hello, I just found your blog via The Crochet Crowd. I am loving this pattern. Can’t wait to get started. I have a secret to tell you, I think Teresa uses trick photography for her left-handed tutorials. She’s a genius either way.
Thank you
LikeLike
The Crochet Crowd has this linked!!! Wow!
LikeLike
[…] taken the same motif and turned it into a turtle, a ladybug, a bee, and now a […]
LikeLike
Love your pattern, love your rant. You are amazing!!!!!!
LikeLike
Just stumbled upon your blog! THANK YOU for the rant! I have only been crocheting for about 6 months and initially I thought that buying patterns from etsy was the way to go….I figured out the hard way that for each pattern on etsy that can usually be found a free one somewhere else online. I was definitely disheartened by the fact that people are willing to take something and make $4 a pop and then claim it as their “original” design when there are tons of the exact same thing out there. Live and learn…
LikeLike
I have to agree with you on this & wish more people would “rant” as you did! There are only a certain number of stitches, and combinations to use. Many people will come up with the same or similar patterns, often without even knowing it! Look at all the basic beanies, or the textured beanies, flowers, scarves… I could go on & on. People need to lighten up! It’s a good thing crochet &/or the stitches don’t have patents!!! It also seems the ones I’ve seen accusing others of stealing their designs are the ones who are selling patterns that are named, or just happen to look exactly like characters that DO have a patent! I have come across many designs that I have initiated the thought of, or started writing a pattern for & know I will share mine for free when I finally take the jump into creating a blog! I did actually write one a couple of years ago for a Hello Kitty scarf that was made for my daughter’s friend. I couldn’t find one, but now I’ve seen a couple on the web. Hmmm, I never posted a picture. How could they have stolen my design/ idea?! LOL!!! 🙂
LikeLike
You and I could be sisters!! ❤ Rant away and have fun with that hook 🙂
LikeLike
I’d like to thank you so much for this free pattern! It’s exactly what I was looking for. The pattern is very easy to follow and I finished it in no time! I have one question, though…Did you attach the hat to the neck or are they two separate pieces?
Thanks again!
LikeLike
Mine were two parts but you can connect them if you’d like. I find it’s simpler if you leave them unconnected. 🙂 Glad you liked the pattern and I’d love to see a finished pic!
LikeLike
Love this pattern! Thanks so much for sharing!
LikeLike
Thanks for the pattern. I agree with your rant.
LikeLike
I’m a little confused, in the picture it looks like the shell is done with hexagon’s (no pentagon) but your pattern says to make one pentagon and 7 hexagons. The picture has total of 7 hexagons, Am I reading this wrong?
LikeLike
Ok, I read the part above the directions which explains about the pentagon, and I figured out the pattern. Sorry my bad!!!
LikeLike
Love that someone has finally said it out loud. So much of it all over the internet. Also love this pattern and my new newphew may be sporting on soon.
Thanks
LikeLike
thanks so much for this 🙂
however, the pattern at scribd you must have a paid subscription service to download.
I’d advise anyone who is wanting to save this pattern to write it down, or copy and paste the text on this page (not the scribd document) into a wordpad document to save to your computer.
LikeLike
You can actually find this for free over in my craftsy shop along with the ladybug and bee 🙂
LikeLike
Just stumbled on this post and could I just say!!!! I Love You! Nothing wierd here but Here Here for your ‘rant’!
LikeLike
Hi: I just made the hexagon turtle prop. I am starting the hat but I tried the E hook, hat seems so small to put on an infant. I took it out and then went to an H hook, but still looks small. I did the first 3 rounds. Is this supposed to fit the head of the infant? It is for a prop the mother wants to put on her baby. Also trying to figure a way to keep the turtle shell on him when picture is taken. Any ideas? I would think it would fall off him unless he is sleeping 🙂 Thanks Mary Ann
LikeLike
The hat is sized to fit a newborn. It’s a regular beanie type hat, so if you would prefer to go with a 10,20,30, etc., increase feel free to substitute it out and then just work the antenna as in the pattern 🙂
LikeLike
Hi Marisa. Thanks ever so much for this pattern. Having just given birth, I was desperate to have a professional photoshoot done for my newborn, but couldn’t afford that so decided to do a home shoot instead. As has been previously mentioned, I saw the original picture when it went viral and was able to pretty much work out how to make the shell myself, but I much prefer having a pattern at hand for easy reference so this has proven perfect. Thanks so much. I’m working on an Owl version which I’ll be happy to share if I can work out how to write up the pattern! (As an aside note, after facing my own difficulty in affording an expensive photoshoot, I have set up a very small service where I hope to rent these props to others who would love to be able to have some cute photos but can’t afford a photoshoot and perhaps are not able to craft such lovely items as these. I presume that this would be ok to use items I have made using your pattern if I link back, in the same vein as if I was selling the made items, rather than renting them?)
LikeLike
I’d love to host your version of the turtle! If you need help with the pattern writing part of it you can find me on fb or email me 🙂
LikeLike
I plan to make this for a friend who just found out she’s going to be a grandma! You include the Pentagon pattern but do I need that pattern to make the turtle?
LikeLike
The pattern that follows after the pentagon is done with hexagons. You can choose to make the prop with either motif. If you are going with pentagons just make one less 😉
LikeLike
Hey the tail kept curling so I Slip stitched up to the tip from the base and then followed the tail pattern again. This made a second leaf shaped tail with an open side! I stitched down the open side with a needle and then attach the tail to the blanket!
LikeLike
[…] A friend from my co-op calls me and says, “Hey, my sister is a professional photographer and she loves the crocheted newborn photo probs. Can you make me a turtle?” I looked around the internet and found the pattern at HodgePodge Crochet […]
LikeLike
I tried making the hex and it came out just like the pent. What am I doing wrong? The instructions look the same.
LikeLike
There are two patterns in this post. Are you sure you’re following the one for the hexagon?
LikeLike
Hi Marissa, I just love you patterns. I have make a turtle, ladybut and a bumble bee using the turtle pattern. Thanks a million for sharing that with us.
LikeLike
Marissa, I cannot print or download your patterns, and I don’t have Scribd. I just found your site today. Please help
LikeLike
The pattern in Scribd is free. All you have to do to print it is click the word SCRIBD at the bottom of the pattern (it’s in blue) and it will take you to the Scribd website–where you don’t have to be a member or download anything. In the top corner you will see a button that says, “DOWNLOAD or PRINT”
Click that and you’ll be able to print the pattern 🙂
LikeLike
My daughter sent me a link to this pattern. I would love to print the pattern; however, when I went to Scribd and clicked the button, it said I have to be a member or a premier reader in order to download or print the pattern. Membership is $5 a year. How do I get to your craftsy shop? And I also agree with your rant. As a shop owner in Etsy myself, I know how easy it is to find many similar (or identical) patterns in many shops. (I can’t believe they all had the nerve to copy my designs! lol) Thank you so much for your help.
LikeLike
You can find me here: http://www.craftsy.com/user/400300 and thanks for the feedback about Scribd. I’ll edit this blog post to reflect my move over to Craftsy 🙂
LikeLike
To correct my previous post, Scribd membership is $5 a month, not a year.
LikeLike
Thank you for all your free patterns. 🙂
LikeLike
As curious as to what size this patten is. Id like to make about a 9-12 mo size for my daughter for halloween. Thank you!
LikeLike
This will fit up to a size 3 months. To scale it up and make it fit, increase your hook size to an H and add an extra round on each pentagon. I’ll bet she’ll be the hit of Halloween!! 🙂
LikeLike
hey marissa! thanks for the cute pattern for free! just wondering – are we allowed to make and sell them if we acknowledge we got the pattern from you? thanks, kara 🙂
LikeLike
Absolutely!
LikeLike
Hi – just wondered if you know that you started with a pentagon but then switched to a hexagon (which personally I think I like better than the pentagon). I don’t even know why that person got so upset .. the avg crocheter can figure out the “pattern” just by looking at the pictures. (well at least I can).
LikeLike
The post you see is the third edit 🙂 The original was done with pentagons. Actually, you can find a pic of my finished hexagon turtle in a photo folder in the fb page.
I promised the person (who claimed she was the first to come up with the idea) that I would run with my hexagon version instead of the pentagon BEFORE I found out that she was ripping off copyrights left and right in her Etsy shop–she still is actually…. We’re talking Disney and Warner Bros. I stand behind my promises so I swapped out my pentagon turtle for my hexagon one.
I never promised her that I wouldn’t show people how to make a hexagon motif (or that I’d never make another prop using them).
That’s why I left it up 🙂 I agree with you that it’s not difficult for your average crocheter just to make it out from her pics that are plastered all over the internet. Her photographers do a great job at showing all of us exactly how it’s put together!
LikeLike
I want to say THANK YOU! For this beautiful pattern and tutorials. 🙂 I am an avid knitter and fairly new to chrocheting. I have a friend who is requesting I make her one of these for her soon to be born baby. I am one of those people who will not willingly pay for a pattern but will find all the knowledge I can about how to adapt a pattern from free resources. I completely agree with your rant too 😉 There is alot of blatant TM, copywright, and liscensing infringements out there. It’s one thing if you use it for your personal use but a complete other if you use it for profit. Now off to try this out 🙂
LikeLike
I’m just learning to crochet andni love this!! I just need to learn how to read patterns now so I can make this!! Thanks for sharing!!
LikeLike
Hi, I just found this yesterday and had to try making it just for the fun of it… it’s sooo adorable! Just one quick question…. if you do include the neck portion, is it attached to the hat (so the shell/hat are all one unit)? If so… I didn’t see instructions on how to do that… could you clarify for me? Thanks! 🙂
LikeLike
The neck portion is totally optional. If you’d like to add one you would just attach your yarn up at the top. ch 2, hdc 8 across, ch 2, turn. Then you’d do two more rows like that and finish off. Super simple 🙂
LikeLike
I also seen her batman and robin patterns but can’t get them i sure hope you can make a pattern of your own batman and robin like you did the ladybug and turtle i love them and thank you so much if it was not for you i could not make these wonderful items for my daughter thank you again
pam
LikeLike
Hi Marissa – love your patterns. For some reason my computer freezes up when I try to print out the pattern. Is it possible to send me a link to the pattern only for the turtle and ladybug? I would appreciate it very much!
LikeLike
I’ve uploaded it to my Scribd account and linked it so that everyone will be able to print it. Thanks for the suggestion!
LikeLike
Question: I’m making this prop for a baby who is in 3 month clothing. Should I be using the pentagon motif and just make six? You explain how to put together the hexagon, but not sure where the pentagon comes in. Help!
LikeLike
You can use either. Both styles will yield similar results.
I would size up your hook to make this prop a little larger. The finished project (using the suggested hook size) measures roughly 14 inches. Just something to keep in mind before you start!
LikeLike
I have tried this pattern 3 times now and simply can not make it work. My ‘hexagon’ is curling up like a ball and not laying flat. Gah! I am so frustrated and wish I knew what I was doing wrong. The counting is all wrong for me. It says I should have 12 fpdc and 12 dc, and I, by simple math, can not figure out how I am supposed to have that many stitches by the 2nd round. Love your finished product but can not seem to make it work for me 😦
LikeLike
I’m soooo sorry this one is frustrating you, but I’m here to help! This pattern is worked with front post double crochet. That means you have to work the post in front of the stitches–and then attack the stitches from the top. When you do that you are sort of double teaming the stitch–putting a stitch in front of it and then on top of it–that’s how you get 12 front post AND 12 regular dc.
Project puckering is all about stitch tension. It sounds like you are a tad upset, lol. Trust me–I’ve been there! If you are stressed out you might be holding on to things a little tightly and that could cause the curling. Overly tight stitch work, or even inconsistent tension, will cause a warbled effect.
Take a breather! Pat yourself on the back for getting to round two! This is a complicated pattern for a motif but I promise, once you get it down you’ll be addicted. It might help to check out youtube. You can find LOADS of great tutorials on how to perform a front post stitch. That will help you visualize what’s required with this pattern.
Most of all, DON’T GIVE UP! We learn more by our mistakes than by our successes! Let me know if there is any other way I can help you make this project. Don’t hesitate to ask! If you can’t wait here–come find me on facebook. I’m always hanging around there somewhere!
LikeLike
I was the same way, Stacey, when I first started this project. I wondered…”How can one little medallion kick my behind so bad?!?!?”….But I was just so frustrated that I was defeating myself. I put it down for a while, did other things, and when I came back to it, it all fell into place and made sense, and I got those 7 medallions done in no time. You can do it too! I’ve only been following patterns for a year and I did it!! Good luck!!!
LikeLike
Thanks for your comments and support ladies. I ended up completely modifying and just trying to make a 6 sided medallion on my own. I have 6 complete now and ran out of yarn – ooops! I need to make my 7th, and then work on stitching them together. If it doesn’t come together nicely, I am going to give this another try. thanks for responding and trying to clear it up for me!
LikeLike
[…] to do some looking around to get the look I wanted for the blanket part of the set. I found this tutorial from HodgePodge Crochet, which I followed for the most part. I think I connected the pentagons I […]
LikeLike
Exactly what I was looking for as a gift for a friend’s soon to be baby. Thank you.
P.s. I LOVE your rant. ❤ ahh-mazing
LikeLike
Thank you for this! Eye opener for your beginning comments as I almost bought the pattern.. I want to make a couple up for friends and will NO WAY charge anyone 40 bucks for this! Patterns are free, crocheting is time… but happiness that this will bring for a photo prop is priceless 🙂
LikeLike
Marissa, Thanks so much for the turtle pattern. I made it for a friend (mother of 4) who just started her photography business and can’t afford props yet. It will be a big help to her.
I’m looking for a Santa hat to crochet, one of those longgggg ones that kinda wrap over the baby. Do you have a pattern for that?
Cyndi
LikeLike
I think I have an idea of what you mean. When I think longggg Santa hat my head automatically thinks “elf hat pattern”. You can find a free pattern for one at All Free Crochet. If you want it to be Santa then I’d just switch up that colors using red for the hat and white for the brim. Make the puff in white and you’ve got an instant cutie pie Santa!
LikeLike
That’s it!!…Thank you!!!….This will look great made with the sparkly red and white that I have.
LikeLike
Yey!! I’m happy to have helped! Hope you’ll post a finished pic over at HodgePodge when you’re all done. I’d love to see how it turns out!
LikeLike
Thank you so much for the patterns the turtle and ladybug i am so glad i found you i could not buy them because we didn’t have the money and then here you are thank you so much they look wonderful
LikeLike
You’re very welcome Pam!
LikeLike
Hello! Thank you for putting up this pattern for free. My cousin is having a baby boy and posted a photo of this turtle shell design on my Facebook wall and asked me to crochet it for her. Her belief in my capability comes from the fact that I was able to successfully knit her 4 year old son a scarf. Also apparently it doesn’t matter that I don’t knw how to crochet. Either way I saw it and loved it and have now set my sights on learning how to crochet so I can get started on this cute creation. If I’m successful I’ll send you a pic!
LikeLike
If you’ve never crocheted before, this pattern is a tricky one to begin learning with. It involves some advanced techniques you might get frustrated with figuring out.
I highly recommend The Art of Crochet on YouTube for learning your basics. She does a wonderful job of teaching crochet and has everything you will need to be successful with this turtle prop!
I wish you all the best and I’ll be waiting on that pic! If you need any help, come find me over at HodgePodge. :0)
LikeLike
Thank you so much for the pattern! I got a request for this little turtle set from a family member. Took one look at the pictures on Etsy and knew the $5 pattern was a waste of money. Hello, it’s granny motifs! Most of us broke in our hooks on one granny or another while learning to crochet. I’ll be the first to admit though that just because I can wing my own pattern doesn’t mean I want to. 🙂 I’ll leave winging if for the next project I see someone on Etsy charging way to much for as they pretend they’ve invented and trademarked the wheel. Unless of course someone like you has once again published the (obvious) pattern for free.
LikeLike
holy cannoli i have been looking for just this!! now after reading it i dont know if i have all of the hooking powers i will need :oP but i’ll try! thank you so very much!
LikeLike
Could u possibly do a video tutorial and post to youtube , i can not unerstand patterns
LikeLike
Thank you so much for this pattern! LOVE it! And love that you are showing everyone how to do it! Crochet is an art form that’s making it’s way back! I love that it’s no longer just granny square blankets but the techniques are being reused to make new and cute things today. Makes me proud to be a fellow “hooker” 🙂 Sorry you were being harrassed by another person…..some people’s sense of entitlement to things are absolutely crazy! THANK YOU for sharing!
LikeLike
You are amazing! I’m totally intrigued with your designs! I actually did those loop stitch booties myself after seeing the pattern on etsy and not wanting to pay over $5 for it. Then I saw your tutorial and had to laugh that someone else like me was figuring it out too! Keep up what you’re doing!!!!
LikeLike
Awesome! Thank you so much!
LikeLike
I bought this pattern on Etsy a few months back when there wasn’t a free one available. But there were many similar patterns available through different people on Etsy, also for a fee. I have no idea if I bought it from the original designer. I also find it strange how people get so upset about people copying their ideas, when they take their ideas from elsewhere. I am pretty sure that Superman, Batman and Robin and others are pretty heavily copyrighted. It has been my experience that most companies and individuals are ok with you using their design (Superman, etc) as long as you are not going to make money from it. You are not making money from the turtle design. Also, if you are writing a pattern for an amigurumi, they all start with the same basic circle pattern. How does anyone copyright that? If people think that they can’t write their own patterns they just need to make a few free ones and see where the basic shapes come from and then have a go at making their own. Thank you for letting everyone have a free go.
LikeLike
You are 100% right about Superman, Batman and Robin–AND MICKEY! In all seriousness, what upset me the most in this situation was the idea that she basically said I stole from her (which I disagree–I was inspired by a photo I saw that I had no idea was of her turtle, but the pattern that resulted is all mine), and then when I went to her Etsy store I found that she was making a profit off characters that belong to someone else. That’s pretty gutsy if you ask me–especially when the companies that own those characters are Warner Bros., and Disney. It wasn’t much work to find the legal team at both places and send along the links (which she has since removed from Etsy but aren’t too hard to find everywhere else….) and another email to Etsy. They’ve all responded telling me that they are investigating.
Such a shame it had to come to that but what can you do when someone basically tells you they own the pentagon motif…
LikeLike
You are awesome!!!!! I got in trouble for asking for a free pattern on this…I am very thankful for the ppl who know how to crochet and helped me make one without a pattern. I love your pattern. Keep hooking!
LikeLike
It was your pattern. Nobody should be able to tell you not to post it. Thanks for everything!
LikeLike
The sad thing is now she’s practically stalking me….
LikeLike
Thank you for this seriously cute set… and the original, I saved it cuz I was afraid you would take it down. Will post pics on fb when its done 😀
LikeLike
Thank you Tanya for sharing your patterns and ideas with us crafters!!! You are such a great person for sharing your knowledge. Keep up the GREAT work.
LikeLike
Thank you so much!! for posting this adorable set free.
LikeLike
How can I private message you? I have something I’ve been wanting to make but know how to.
LikeLike
Ana, if you go to the fb group, you’ll be able to find me there!
LikeLike
I new I should have copied it when the original was up :(, I don’t think you should have given in so easily
LikeLike
Find me on fb Teri. ;0)
LikeLike
I love your patterns, I would love to give them a try myself! I have a queen side crochet blanket single stitched I been working on in between other projects. She is beautiful! Kelly Ann 🙂
LikeLike
I love this pattern!! Thank you soo much for sharing it!! I have the sudden urge to take it and make it an afghan! ^_^ But i think i will start with this adorable pattern. ^.^
LikeLike
Scrap that, just read your facebook page and realised you didn’t buy the pattern. Good on you for providing it for free.
LikeLike
Thanks for providing this pattern for free but there is a lot of people who are not happy with you at the moment. Did you buy the pattern and copy it or did you make it up off the pictures, I believe patterns should be free as well but just be warned about the issues surrounding the copying of this one 🙂
LikeLike
I’ve been wanting to make a ladybug too!! Thanks so much for sharing these with us and for FREE! You are awesome!
LikeLike
Oh my God!!!!!!! You’re so AWESOME!!! I totally agree that knowledge should be shared and passed on to others. I’m so thankful and grateful that you have decided to share this amazing pattern. God bless you!!!
LikeLike
You’re most welcome! I’ve got a ladybug on my hook now–that’ll be coming up very soon!
LikeLike
I can’t wait to see the ladybug! My turtle is almost finished! Thanks so much for sharing the pattern.
LikeLike
I would LOVE to have the ladybug pattern. Will you have it on this site or where will I be able to find it?
LikeLike
Oops, sorry. I found the ladybug pattern. Thank you Sooo much!!! It’s adorable!!
LikeLike
I was just about to link you! 🙂 There is a giraffe too made by Michelle–an amazingly talented crochet artist. I have plans to add in more critters too. Just have to squeeze in the time, lol. Have fun!
LikeLike