
CHEEKY MONKEY BOOTIES
At the request of a super lady, I was asked to tackle Sock Monkeys. I’m not a fan of monkeys but I told you–this particular lady is awesome, so I decided to take on the challenge.
The first thing I did was to take a look at the original pic she sent me to replicate. I looked like this:

Cute…adorable…but more sock than bootie. I guess that makes sense since they are Sock Monkeys, but I wanted to do something different with mine. So, playing on the idea of working in the round (from the toe and moving on back to the heel) and changing colors to separate and highlight the mouth, I got to work. After my first try, I ended up with this:

Frightening, I know. But it was a start–and obviously a work in progress. (When I’m working on new patterns this is always the fun part for me. The more times I completely frog something, the more satisfying the finished result is!)
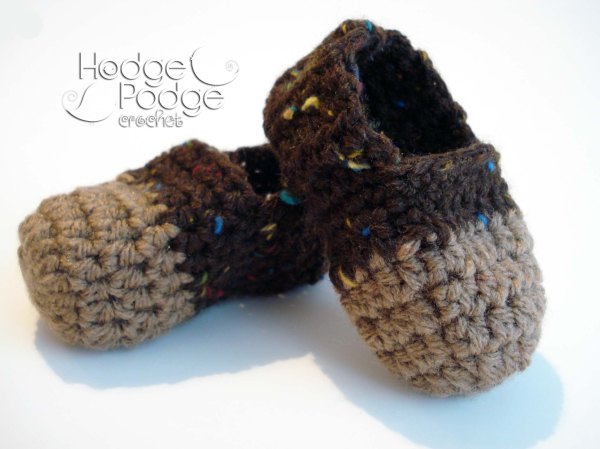
Now that I had the basic idea down, it was time to get to work and scale this monkey down. When I’d finished, this is what I had (Ignore the Hello Kitty applique in the background–I’m working on her for a purse and she got in the way of Mr. Monkey here):

Sock Monkey Bootie
I decided to change up my colors and rework the entire shoe so that it was more traditional brown monkey than Mr. Sock Monkey and what popped off my hook was absolutely adorable even without a face!!
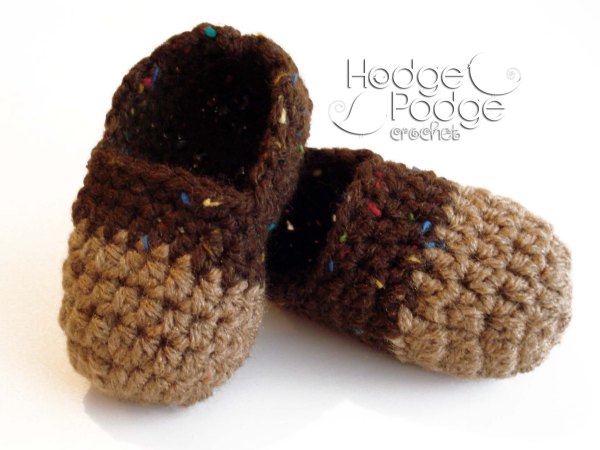
CHEEKY MONKEY BOOTIES
***For a FREE PDF Download (which includes gauge, materials needed, and other important information), please head on over to my Craftsy Shop right now!***
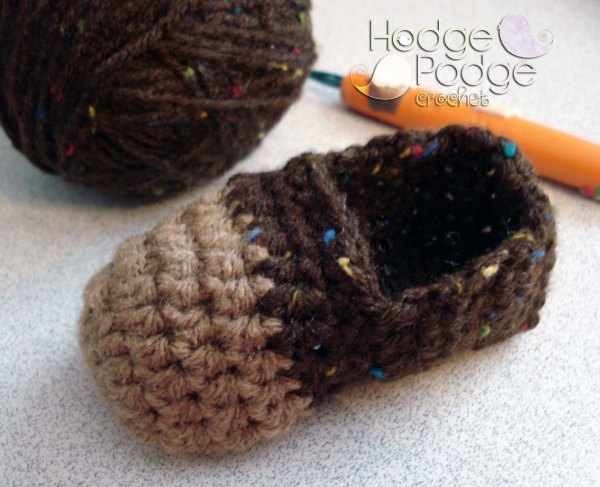
CHEEKY MONKEY BOOTIE: (Make Two)
Beginning at toe with brown (or whatever color you have chosen): make a magic ring and ch 2 (or ch ch 4, sl st in first ch to form ring, ch 2)
Rnd 1: 9 hdc in ring, join with a sl st in top of ch 2. (10 hdc)
Rnd 2: Ch 2, hdc in same space as ch 2, 2 hdc in each st around, join with a sl st in top of ch 2. 20 sts.
Rnd 3: Ch 2, hdc in same space as ch 2 (1 st increased), hdc in each st around, join with a sl st in top of ch 2. 21 sts.
Rnds 4-5: Repeat Rnd 3. (22; 23 sts)
Change color to coffee fleck for the body of your bootie (or whatever color you have chosen.)
Rnd 6: Ch 2, hdc in each stitch around, join with a sl st in top of ch 2. (23 sts)
Rnd 7 & 8: Ch 1, sc in each stitch around, join with a sl st in top of ch 1. (23 sts)
Rnd 9: Ch 2, hdc in the next 15 sts (leaving the last 7 sts unworked), ch 2, turn (16 hdc)
Rnd 10: hdc in next 15 sts, ch 2, turn (16 hdc) Continue until the bootie measures 4 inches from top to toe to heel.
To finish:
Ch. 1, turn bootie inside out (making sure right sides are together) and slip stitch back seam together creating the heel. Finish off and weave in tails.
Optional edging and ears:
Attach coffee fleck (or whatever color you have chosen for the body) with a sl st in any st in the back of the bootie.
Ch 1, sc around side of boot. When you get to the 1st corner at toe top, sc2tog. Sc across toe top to the next corner, sc2tog. Sc around to beginning join and sl st in the top of the ch 1. Finish off and weave in tails.
OPTIONAL CHEEKY MONKEY EARS: (Make Two)
With brown (or whatever color you have used for the toe top): Ch 2, 5 sc in 2nd chain from hook. Change color to coffee fleck (or whatever color you have used for the body of your bootie)
Ch 1, 1 sc in same space as join, [2 sc in next stitch] twice, sl st in each of the next 2 sts, join with a sl st in the top of the ch 1, finish off leaving a long tail for sewing.
CHEEKY MONKEY ASSEMBLY:
Working over rnds 4 and 5: Arrange ear on side of slipper and sew securely. Repeat for second ear. Attach two buttons on top of slipper and sew securely.
Using a small amount of coffee fleck (or any other color you choose) thread a tapestry needle and embroider a smile.
***
If you’ve tried this project (or any other on this blog) and want to share, post a pic to our facebook group! You can also find other pattern freebies over in my Craftsy shop!
![]()
Tagged: Booties and Slipper Patterns, changing colors, Crochet Fashions, cutest baby, HodgePodge Crochet, Monkey, Shop HodgePodge Crochet, sock monkey, sock monkeys, Tutorial


[…] Cheeky Monkey Booties by HodgePodge Crochet – Here is a fun FREE pattern. Check out her blog post for lots of […]
LikeLike
Reblogged this on eleisawifelife and commented:
super cute sock monkey crochet booties pattern! FREE
LikeLike
I made these in about two days, so cute, very easy too. I added a palm palm to the top. Thanks so much.
LikeLike
Where do I find the pattern for the sock monkey booties. I have the pattern for the Cheeky Monkey booties, but would like to have the Monkey ones They are just too Cool!!!. HELP!!
LikeLike
The cheeky monkey includes optional add ons to make it a monkey at the very bottom of the blog post above. 🙂
LikeLike
These are adorable 🙂 I have made basic slippers for my little boy for a couple of years now… How would you make the soles nonslip ? Xox
LikeLike
Some crocheters swear by puffy paint while others prefer to add some shelf lining to the bottoms! 🙂
LikeLike
Get the sticky dots for the bottom.
LikeLike
What size needle is required for the cheeky monkey booties? Ty
LikeLike
For a FREE PDF Download (which includes gauge, materials needed, and other important information), please head on over to my Craftsy Shop 🙂
LikeLike
how can you make these for a size 13 mens shoe.
LikeLike
Sizing these up would be a LOT of work. Luckily, there are already a ton of freebies out there that have done the work for me! All you have to do is search for them 🙂 http://gatuxedo.blogspot.com/ has a pretty good slipper pattern sized for men that might work for you. http://gatuxedo.blogspot.com/2011/04/slippers-for-guys.html
It’s done in the same style as the sock monkey I have here and all you would have to do is follow along and make the necessary color changes in order to turn your finished slipper into a sock monkey.
LikeLike
Love these and will try them asap. Londa, email me..will be happy to send you any patterns I have..no charge.
LikeLike
Loved your pattern. Used it as a basis for some of my own, putting my own stamp on them. Would love to send you a photo.
LikeLike
I’d love the share!! Come find us on facebook! http://www.facebook.com/pages/HodgePodge-Crochet/324108337606586
LikeLike
Ty so much for making this available to everyone. I have made a baby girl’s sock monkey layette & I needed a pattern for the booties. I can’t afford patterns, so I made it from just looking at pictures & added my own flair to it, but I just couldn’t get into my head how to do the booties. So ty so much for helping me out.
LikeLike
oh yes!…..I double checked just to make sure……If you will check out my Facebook page I have posted them…..they are much bigger than my friend’s 2 month old baby’s foot…..I’ll try again later today…..I had made matching hat and diaper cover to go with them…….
http://www.facebook.com/DseyDesigns
LikeLike
I just made these today. I used a size D needle and they ended up fitting my daughter who is 2 years old and a size 7 shoe. They are really cute! However, I’m going to have to revamp the pattern to work for a newborn size foot!…….=D….Thank you for the free pattern!
LikeLike
Whoa! Are you sure? I’ve had this one tested and everyone who has tried it has come out with an infant size using an E hook and worsted weight yarn.
Did you change stitches to sc where indicated? It’s pretty tough to work these loose and come up with such a huge difference in size! Hope you figure it out and I’m positive they’ll be adorable when you’re all done 🙂
LikeLike
I used an e hook & they turned out perfect. I will post them when I am finished with them.
LikeLike
Cute! Saw your post on Facebook’s CROCHETING CLUB.
LikeLike
Welcome! It’s always cool to see a new face from the club!!
LikeLike